Cartridges used:
From My Kitchen; Life is a Beach; Pagoda; Paisley; Old West
Supplies:
Cricut Expression; Design Studio or Gypsy; chipboard; solid color paper; patterned paper; scissors; scoring tool; adhesive; googly eyes
INSTRUCTIONS:-
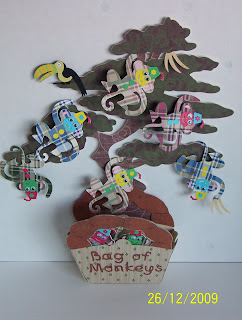
BAG
To create the bag, use either Design Studio or Gypsy. Using the Paisley cartridge, p. 55, place “Purse3” on a 12” x 12” cutting mat, set at 4”. Copy/paste, then flip and change the settings as follows:-
x axis .599; y axis 8.576; Width (W) 5.25; Height (H) 5.409; Rotate -90.87. Flipped image:- x axis 11.215; y axis 3.166; W 5.25; H 5.409; Rotate 88.519.
To create the sides of the bag:- use “Purse3s” (Shift):- x axis 4.956; y axis 1.276; W 1.91; H 3.09; Rotate -.236; other side:- x axis 6.948; y axis 10.542; W 1.91; H 3.09; Rotate 179.63.
To create the tabs for gluing the bag together:- use the lower case “l” from the Old West cartridge, and the Creative Feature “Shadow” as follows:- x axis 4.982, y axis 3.64; W .592; H 2.26; Rotate 109.04. Next one:- x axis 8.848; y axis 2.876; W .59; H 2.25; Rotate 70.717. Next one:- x axis 6.819; y axis 8.3; W .59; H 2.25; Rotate -73.85. Next one:- x axis 3.003; y axis 8.933; W .59; H 2.25; Rotate -108.4.
To create the handle for the bag:- use the lower case “c” from the Old West cartridge, Creative Feature:- “Rope”. x axis 4.836; y axis 9.04; W 4.561; H 5.485; Rotate -173.4. Copy/paste and then flip:- x axis 10.805; y axis 9.093; W 3.856; H 5.424; Rotate -159.2.
Copy/paste the handle onto another page, so it can be cut out separately, using different patterned paper.
Note:- hide selected contour: apple image on the purse.
Using the Cricut Expression and a 12” x 12” cutting mat, cut design out:- use chipboard with the following settings:- Blade: 6; Pressure: high; Speed: medium. Then cut design again, using patterned paper with the following settings:- Blade 4; Pressure: medium; Speed: medium. Cut out handle separately, using patterned paper, with the latter settings. Adhere to handle areas of bag.
TITLE ON BAG
Using Design Studio or Gypsy and the Old West cartridge, place on the cutting mat the words: “Bag of Monkeys”, using the Creative Feature: “Rope”.
Bag: x axis 1.051; y axis .484; W 1.734; H 1.021
of: x axis 3.326; y axis .53; W .987; H .722
Monkeys: x axis .634; y axis 2.176; W 3.966; H 1.036
Cut out title and adhere to the front of the bag.
Score the sides of the bag, fold together, flipping the sides up, and adhere the tabs to the inside of the sides of the bag.
MONKEYS
Paisley cartridge, p. 30, “Monky1”, at 3”. First, cut design out of chipboard (Blade: 6; Pressure: high; Speed: medium). Then use patterned paper (Blade 4; Pressure: medium; Speed: medium). Use the “flip” function and cut out design again with the same patterned paper (for the backs of the monkeys). Continue this 7 more times, front and back (for 8 monkeys). You can use whatever patterned paper you wish but I chose to use co-ordinating coloured paper (red, blue, yellow, green), matching the solid coloured faces to their bodies. Then I alternated the coloured hats and buttons on each of them.
I changed the design up a bit. Instead of using “Shift Monky1”, I did the following:-
For the face: use “Monky1”, Layer 1, cut at 3”. For the buttons: “Monky1”, Button, cut at ¼”. For the ears: “Monky1”, Layer 1, Shift, cut at 3”. For the hat: p. 40, “Mushrm3-s” (Shift) at 1 ¾”, cutting off a bit at the bottom. For the tassel: p. 30, “Monky1”, Layer 2, cut at 3”. For the flowers for the hat: p.67, “Doll2”, Button, cut at ¼”.
TREE
Using Design Studio or Gypsy and the Pagoda cartridge, p. 44, place “Tree1” on a 12” x 12” cutting mat, set at 10 ¾”. Open up new page and place “Tree1-s” (Shift) on mat, at 10 ¾”. Rotate design on the mat (-39.91), so it will fit.
Cut out designs twice using chipboard (Blade: 6; Pressure: high; Speed: medium). Then cut out designs (Blade 4; Pressure: medium; Speed: medium) using different patterned paper for the tree trunk and the leaves.
Adhere everything together.
TOUCAN
Life is a Beach cartridge, p. 49, “Tucan”, “flip feature”, at 2”, using black cardstock. Cut again, using yellow patterned paper but cut everything off, using scissors, leaving the breast. For the beak: “Tucan”, Layers, using different coloured patterned paper. Adhere all the layers onto the black design. Adhere toucan to the tree.
BANANAS
Using Design Studio or Gypsy and the From My Kitchen cartridge, p. 34, place on the cutting mat “coffee”, Layers, at 1 ½”. Change the settings as follows:-
X axis 6.657; y axis 1.997, W 1.5, H 1. Next one: x axis 6.602; y axis 2.346; W 1.747; H 1.112; Rotate -26.36. Next one:- x axis 6.912; y axis 2.472; W 1.615; H 1.087; Rotate -51.66. Move all together, clicking “weld”.
Note: hide selected contour: star
Cut out two using patterned paper (Blade 4; Pressure: medium; Speed: medium).
Adhere one to the tree, another one to the hand of one of the monkeys.
You have now created your very own Barrel of Monkeys game --- only it’s called “Bag of Monkeys”. :-) The monkeys can either be stored in their little bag or, if they’re feeling frisky, they can play on their very own tree. I’m sure any child would love this. I showed it to my 22 year old daughter and she thought it was really cute. :-)


 By the smile on his face, I think he's happy with what Santa brought him. :-) Now he has four beds. Yeppers! -- four beds. A boy can't have too many beds, eh? LOL Plus.....new toys! ;-)


 Now the problem lies in where/how are we going to store them all. I put drycleaning plastic bags over the above but we'd still like to put them in some containers. Any suggestions would be greatly appreciated. :-)


