
Welcome ladybug

Thanks for stopping by
Thanks for stopping by. Hope you enjoy your stay!
I've noticed that I have visitors from all over the world. To make your stay more enjoyable, I have added a "translator" for you.
I've noticed that I have visitors from all over the world. To make your stay more enjoyable, I have added a "translator" for you.
Thursday, January 28, 2010
Blog Candy
If you like blog candy, you have to hop over HERE.
Amanda is giving away 3 Cricut Winter Mini carts. Her drawing will be held February 10, 2010. See her blog Cricut Creations by amkscrap, for details on how to enter.
Here's what they look like:-

Friday, January 22, 2010
Another bargain.....
Found another bargain at the thrift store:-

It's actually 18 li'l paint bottles for models (airplanes, cars, etc.) but I'm going to use it for my Stickles. One li'l prob-lem-o is that I don't have any Stickles. LOL I have a couple of "Distressed Stickles" but I would really like to get the "real deal" -- the pretty, gorgeous ones. All in due time. :-)
Here you can see how the Stickles fit nicely in the paint bottle spot. And......it actually is a turntable, too! How cool is that, eh? And all for just $4.00. Love these finds!! :-)

I'm also considering drilling some holes in each compartment so that the bottles (whenever I do get them) lol, will fit in there, upside down. Heard that was the best way to store Stickles.
You may even have this li'l gem in your own house and not even know it ---- if you have a child or even hubby who's into model cars, etc. :-)
Saturday, January 16, 2010
My "Cropping With the Stars" Entry
Well, again, I didn't win anything but there was some very stiff competition. Check out the winner(s) here:- http://www.cricut.com/cropping/. Some awesome entries!!


The monkeys hanging from each other (as the game is usually played).

I totally misunderstood the rules and thought you couldn't use anything already pre-made or bought; hence, I totally designed/created the entire project using only the Cricut cartridges listed in the rules.
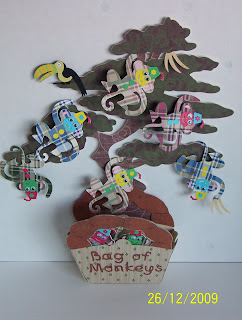
Here is my entry:-
Project Name: Bag of Monkeys
Inspiration: Barrel of Monkeys game

showing the backsides of some of the monkeys.....

The monkeys playing in the tree, and a couple of them peeking out of the bag....

A close-up of the monkeys in the bag.....

The monkeys hanging from each other (as the game is usually played).

Cartridges used:
From My Kitchen; Life is a Beach; Pagoda; Paisley; Old West
From My Kitchen; Life is a Beach; Pagoda; Paisley; Old West
Supplies:
Cricut Expression; Design Studio or Gypsy; chipboard; solid color paper; patterned paper; scissors; scoring tool; adhesive; googly eyes
INSTRUCTIONS:-
BAG
To create the bag, use either Design Studio or Gypsy. Using the Paisley cartridge, p. 55, place “Purse3” on a 12” x 12” cutting mat, set at 4”. Copy/paste, then flip and change the settings as follows:-
x axis .599; y axis 8.576; Width (W) 5.25; Height (H) 5.409; Rotate -90.87. Flipped image:- x axis 11.215; y axis 3.166; W 5.25; H 5.409; Rotate 88.519.
To create the sides of the bag:- use “Purse3s” (Shift):- x axis 4.956; y axis 1.276; W 1.91; H 3.09; Rotate -.236; other side:- x axis 6.948; y axis 10.542; W 1.91; H 3.09; Rotate 179.63.
To create the tabs for gluing the bag together:- use the lower case “l” from the Old West cartridge, and the Creative Feature “Shadow” as follows:- x axis 4.982, y axis 3.64; W .592; H 2.26; Rotate 109.04. Next one:- x axis 8.848; y axis 2.876; W .59; H 2.25; Rotate 70.717. Next one:- x axis 6.819; y axis 8.3; W .59; H 2.25; Rotate -73.85. Next one:- x axis 3.003; y axis 8.933; W .59; H 2.25; Rotate -108.4.
To create the handle for the bag:- use the lower case “c” from the Old West cartridge, Creative Feature:- “Rope”. x axis 4.836; y axis 9.04; W 4.561; H 5.485; Rotate -173.4. Copy/paste and then flip:- x axis 10.805; y axis 9.093; W 3.856; H 5.424; Rotate -159.2.
Copy/paste the handle onto another page, so it can be cut out separately, using different patterned paper.
Note:- hide selected contour: apple image on the purse.
Using the Cricut Expression and a 12” x 12” cutting mat, cut design out:- use chipboard with the following settings:- Blade: 6; Pressure: high; Speed: medium. Then cut design again, using patterned paper with the following settings:- Blade 4; Pressure: medium; Speed: medium. Cut out handle separately, using patterned paper, with the latter settings. Adhere to handle areas of bag.
TITLE ON BAG
Using Design Studio or Gypsy and the Old West cartridge, place on the cutting mat the words: “Bag of Monkeys”, using the Creative Feature: “Rope”.
Bag: x axis 1.051; y axis .484; W 1.734; H 1.021
of: x axis 3.326; y axis .53; W .987; H .722
Monkeys: x axis .634; y axis 2.176; W 3.966; H 1.036
Cut out title and adhere to the front of the bag.
Score the sides of the bag, fold together, flipping the sides up, and adhere the tabs to the inside of the sides of the bag.
MONKEYS
Paisley cartridge, p. 30, “Monky1”, at 3”. First, cut design out of chipboard (Blade: 6; Pressure: high; Speed: medium). Then use patterned paper (Blade 4; Pressure: medium; Speed: medium). Use the “flip” function and cut out design again with the same patterned paper (for the backs of the monkeys). Continue this 7 more times, front and back (for 8 monkeys). You can use whatever patterned paper you wish but I chose to use co-ordinating coloured paper (red, blue, yellow, green), matching the solid coloured faces to their bodies. Then I alternated the coloured hats and buttons on each of them.
I changed the design up a bit. Instead of using “Shift Monky1”, I did the following:-
For the face: use “Monky1”, Layer 1, cut at 3”. For the buttons: “Monky1”, Button, cut at ¼”. For the ears: “Monky1”, Layer 1, Shift, cut at 3”. For the hat: p. 40, “Mushrm3-s” (Shift) at 1 ¾”, cutting off a bit at the bottom. For the tassel: p. 30, “Monky1”, Layer 2, cut at 3”. For the flowers for the hat: p.67, “Doll2”, Button, cut at ¼”.
TREE
Using Design Studio or Gypsy and the Pagoda cartridge, p. 44, place “Tree1” on a 12” x 12” cutting mat, set at 10 ¾”. Open up new page and place “Tree1-s” (Shift) on mat, at 10 ¾”. Rotate design on the mat (-39.91), so it will fit.
Cut out designs twice using chipboard (Blade: 6; Pressure: high; Speed: medium). Then cut out designs (Blade 4; Pressure: medium; Speed: medium) using different patterned paper for the tree trunk and the leaves.
Adhere everything together.
TOUCAN
Life is a Beach cartridge, p. 49, “Tucan”, “flip feature”, at 2”, using black cardstock. Cut again, using yellow patterned paper but cut everything off, using scissors, leaving the breast. For the beak: “Tucan”, Layers, using different coloured patterned paper. Adhere all the layers onto the black design. Adhere toucan to the tree.
BANANAS
Using Design Studio or Gypsy and the From My Kitchen cartridge, p. 34, place on the cutting mat “coffee”, Layers, at 1 ½”. Change the settings as follows:-
X axis 6.657; y axis 1.997, W 1.5, H 1. Next one: x axis 6.602; y axis 2.346; W 1.747; H 1.112; Rotate -26.36. Next one:- x axis 6.912; y axis 2.472; W 1.615; H 1.087; Rotate -51.66. Move all together, clicking “weld”.
Note: hide selected contour: star
Cut out two using patterned paper (Blade 4; Pressure: medium; Speed: medium).
Adhere one to the tree, another one to the hand of one of the monkeys.
You have now created your very own Barrel of Monkeys game --- only it’s called “Bag of Monkeys”. :-) The monkeys can either be stored in their little bag or, if they’re feeling frisky, they can play on their very own tree. I’m sure any child would love this. I showed it to my 22 year old daughter and she thought it was really cute. :-)
Tuesday, January 12, 2010
Bailey's score at Christmas
New Christmas Decorations
Well, we finally took down our Christmas tree and decorations. Usually, I'm alright with them being put away first week of January, but this time I was really sad to see them being taken down. :-( I think it has a lot to do with the fact we had an electrical fire two Christmas's ago and it still sticks with me. So now I like to extend the Christmas season as much as possible.
But we do get to enjoy it a bit more because we scored BIG time with the seasonal sales. We had been eyeing some decorations before Christmas but they were still regular price. However, when they went down to 70% off, that was a whole different story. (tee-hee)
Hubby couldn't make up his mind between the Santa and the Nutcracker, so he got both. :-) They're both a beautiful lavender, silver and green.


Then, of course I had to get an angel for myself. ;-) Isn't she simply gorgeous? :-)

I had really wanted this set I saw at Home Sense but, again, it was regular price. When it went down to 50% off and it was STILL there, we snagged them. The angel stands 47" high and the Nativity Scene stands 44" high. Both a gorgeous burgundy, which is one of my fav. colours. Now the problem lies in where/how are we going to store them all. I put drycleaning plastic bags over the above but we'd still like to put them in some containers. Any suggestions would be greatly appreciated. :-)
But we do get to enjoy it a bit more because we scored BIG time with the seasonal sales. We had been eyeing some decorations before Christmas but they were still regular price. However, when they went down to 70% off, that was a whole different story. (tee-hee)
Hubby couldn't make up his mind between the Santa and the Nutcracker, so he got both. :-) They're both a beautiful lavender, silver and green.


Then, of course I had to get an angel for myself. ;-) Isn't she simply gorgeous? :-)

I had really wanted this set I saw at Home Sense but, again, it was regular price. When it went down to 50% off and it was STILL there, we snagged them. The angel stands 47" high and the Nativity Scene stands 44" high. Both a gorgeous burgundy, which is one of my fav. colours.
 Now the problem lies in where/how are we going to store them all. I put drycleaning plastic bags over the above but we'd still like to put them in some containers. Any suggestions would be greatly appreciated. :-)
Wednesday, January 6, 2010
Just before dusk.....
Here's a pic taken just before dusk, from our front door. The tree in the foreground is a Japanese Plum, that is simply beautiful in the Spring. LOVE the colour of the sky. Isn't it gorgeous? :-)


Monday, January 4, 2010
Ink Pad Storage
Found this cute li'l homemade CD rack at a thrift store for $1.00. The slots were a li'l too small to insert my stamp pads in, tho, so hubby took out every other row.


Subscribe to:
Comments (Atom)
FeedJit Live Traffic Feed
Thank you for visiting ladybug

Birdie thank you
