owl

Background Image - Ladybug

Follow Me Frame

Follow Me Frame

More to see

More to see

Translation Button

Welcome ladybug

Welcome ladybug

Thanks for stopping by

Thanks for stopping by. Hope you enjoy your stay!

I've noticed that I have visitors from all over the world. To make your stay more enjoyable, I have added a "translator" for you.


Wednesday, June 29, 2011

Warm Thoughts card

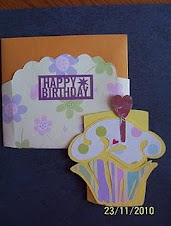
Made this card for a family that’s going through a really rough spell.


Inside:-

Tools/Items:-
Cricut Imagine
Cricut Imagine Cartridges – see below
Cricut Cartridge – Lyrical Letters
Martha Stewart Punch – Monarch Butterflies Trim
Glue – regular; ATG; Zig Two Way
Cardstock – green; white (for the Imagine)
Popdots
Flower
Rhinestones
Corner punch

Cricut Imagine Cartridges
Best Friends – frame
Better Together – flower and butterfly, w/ layers

Created completely using the Cricut Imagine. Used the frame from the Best Friends cart., w/ a rectangle Stock Image and the green pattern from the Best Friends cart, which was placed behind the frame. The flower and butterfly were from the Better Together cart. Put rhinestones on the butterfly’s wing. Everything was popdotted in layers.

The sentiment on the front of the card was “Warm Thoughts” from the Lyrical Letters cart. Used the Color Cop and the RGB codes to find the shades of pink and green. (Pink for “Warm Thoughts” and the sentiment on the inside of the card; and green for “FLUTTER”). The flower is hand-made by a special Cricut friend I met, through winning her blog candy. You should really check out her blog:-

CRICUTROOKIE .

She has some amazing creations! :-)

The butterfly border on the inside of the card was created w/ the MS Butterfly punch, rhinestoning various ones.

The font I used for "FLUTTER" is KR Butterfly.

The sentiment was computer-generated, using RGB codes.


Friday, June 24, 2011

Wedding Card

Made this wedding card for our niece. Her colours are ivory and mauve, so made the card accordingly, using the Cricut Imagine w/ RGB codes.Inside:-


Tools/Items:-
Cricut Imagine
Cricut Cartridge – Everyday Paper Dolls
Cuttlebug
Cuttlebug folders -- Birds and Swirls; Divine Swirls; Swiss Dots
Martha Stewart Corner Punch – Loops Heart
Glue – regular; ATG; Zig Two Way
Cardstock – glittered paper by Paper Reflections; white (for the Imagine)
Popdots
Prima flowers
Ribbon
Flower
Seed beads
Embellishments

Using the Everyday Paper Dolls cart, created the bride and groom w/ their layers. The bride’s dress/veil are both in ivory, w/ mauve shoes. She’s holding a bouquet of mauve Prima flowers. The veil was Cuttlebugged w/ the Divine Swirls folder, while the dress was Cuttlebugged w/ the Swiss Dots folder. The groom has a mauve tie and his ensemble is in black. Both were pop-dotted.
The flower/vine arch was also from the Everyday Paper Dolls cart, embellished w/ mauve Prima flowers and seed beads. The grass is also from the Everyday Paper Dolls cart.
The blue glittered cardstock was Cuttlebugged w/ the Birds and Swirls folder.
The sentiment was computer-generated and corner punched w/ the MS Loops Heart.
We wish them years of happiness. :-)


Thursday, June 23, 2011

Latest Cricut Cartridge Check List - June 2011

Hiya. As promised, I have now updated my Cricut Cartridge Check List.

ProvoCraft released the “Hello Thursday cartridges” three times this month. WhoooHoooo! -


Four new Cricut Lites:-


Then, they released two different styles of carts:- Events and Projects:-


If you haven't already discovered the new Cricut Blog, you can find more info about these new cartridges (& much MORE) here:- http://cricutblog.org/

Here's the latest Cricut Cartridge Check List.

http://www.mediafire.com/?9t85qctmusefwrb

Because of the two new different styles of Cricut cartridges, I decided to add two separate sheets to the Checklist. There are now 5 different sheets of Cricut cartridges:

  • Cricut (regular)
  • Cricut Events
  • Cricut Imagine
  • Cricut Lite
  • Cricut Projects

Hope you enjoy!!


Tuesday, June 21, 2011

Another Father's Day Card

Made this card for my FIL. This is the first time I’ve created an origami shirt. Found this video which really helped:-
Inside:-

Tools/Items:-

Patterned paper
Glue – ATG
Popdots
Brads – for buttons on shirt

This card was a really quick/easy project. I was really surprised how easy it was to make the shirt. The instructions were great. After layering the front of the card, inserted 3 brads on the shirt and pop-dotted it onto the card. Sentiment was computer-generated.

Father's Day Card

Hiya. Well, something else should've been added to the video below ---- forgetting to post my Father's Day cards. LOL

So, here they are. Better late than never, right? LOL LOL

Made this card for my step-FIL. He loves to fish, so it was just apropos to make a li’l fisherman.

Inside

Tools/Items:-

Cricut Imagine
Cricut Cartridge – Everyday Paper Dolls
Martha Stewart Punch Around the Page – Quilted
Glue – regular; ATG; Zig Two Way
Cardstock – patterned; white (for the Imagine)
Corner rounder
Popdots
Baker’s Twine – fishing line, fish basket handle
Stampin’ Up Ink – Creamy Caramel
Brad – for closure on fish basket

Created totally on the Cricut Imagine, floodfilling the layers using RGB codes. Inked all the edges and parts of the layers to allow the cut lines to show thru. Used the border punch on the inside design edge and the corner punch on the sentiment. Sentiments were computer-generated.


Friday, June 17, 2011

Funny Video

Someone sent this to me and I just had to share it. OMG, I laughed soooooo much because this is soooooooooo ME!! LOL LOL

Before you listen to it, be sure to turn off my I-Pod at the bottom of this column.

Hope you enjoy it, too!


Tuesday, June 14, 2011

Bee-lated Birthday

Made this card for a dear friend’s mother, who is a real sweetheart! :-)

Inside of card:-


Tools/Items:-
Cricut Imagine
Cricut Cartridges – see below
Martha Stewart Corner Punch – Eyelet Lace
Martha Stewart Deep Edge Punch – Flower Bed
Glue – regular; ATG; Zig Two Way
Cardstock – blue; white (for the Cricut Imagine)
Corner rounder – Corner Stone by EK Success
Popdots
Rhinestones – on bee and butterfly

Cricut Cartridges
Disney Pooh & Friends – bee hive
Disney Happily Ever After – tree
Paisley – bee
Wall Décor & More - butterfly

This card was completely created on the Cricut Imagine, flood-filling designs, using the regular Cricut cartridges. I used the “Color Cop” to obtain the RGB codes for the hive via DisneyClipart and mimicked the same colors in the Cricut handbook for the li’l bee. What an awesome way of getting the exact colours. No fumbling thru coloured cardstock to find the right shades --- the Cricut Imagine does it all!

I attached the branch w/ the bee hive to the main tree. By using the same color, via “Color Cop”, for both the branch and the tree, it makes it seem like the branch w/ the bee hive was actually part of the tree. :-)

The inside of the card was created using the Flower Bed punch, punching it on both sides of the paper, to create a double border. Rhinestones were placed on the butterfly, which was glued to the border. The sentiment was computer-generated. Used some cute fonts:-

“LMS Spelling Bee” --- gives the look of a bee buzzing along. You can see a li’l bee attached to the “W”.
“Hunny's Bees” – the first letter has a li’l bee attached to it, w/ the rest of the letters in a “flower”.

The rest of the words were done in “Tinker Toy”.

Hope she enjoys this card, as much as I enjoyed making it for her.

Thanks so much for looking and I hope you have a great day!


Monday, June 13, 2011

Cricut Cartridge CheckList update

Hiya! Rumour has it that ProvoCraft will be having three "Hello Thursdays" this month. Rather than updating the CheckList each time, I'm going to wait until they release all of their new cartridges and then update the CheckList. :-)

Wednesday, June 8, 2011

It's Bella's birthday!

Isn't this the cutest li'l girl you've ever seen?? Well, it's her birthday today and she's 3 yrs. old. My li'l Bailey loves looking at her pix!! :-) Bella and Bailey are both YorkiePoos. :-)

Bailey would like to wish Bella a HUGE:-

If you wanna see more pix of li'l Bella, check out her momma's blog: Two Pink Peas.


Sunday, June 5, 2011

World's Smartest Dog --- Jesse

OMG, if you haven't already seen this "wonder dog", you have to check this out. He even helps around the house!!!!! Super cute!!! :-)

Make sure you turn off my I-Pod, before watching this, tho! :-)


Saturday, June 4, 2011

Storage container – repurposed

Have you ever bought an item for a particular need, then decided against it and. . . . then it just sat there? Well, I have. I bought this container for the purpose of housing my Cricut cartridges. This was when I only had a hand-full of them. Since then, my stock of cartridges have mysteriously grown! Funny how that happens, eh? LOL I’m sure that poor li’l container has been feeling neglected. :-(
Until now! :-)

I just recently bought a Sew Easy Stitcher starter kit. I’m one who likes to keep these li’l gadgets all contained in one place; otherwise, I’d lose them and never find them again. So, this kit has been sitting in its original packaging, awaiting a home. Then I spotted this poor, lonely container. Look at how all the pieces fit so nicely in there. It’s almost like it was “meant to be”.

I only have 4 heads for the Stitcher, so I have one in each compartment; however, the compartments will hold two heads. So this container can house 14 heads and one more Fancy Floss.


Here's the back of the storage unit, which holds the piercing mat and anything else you want to put into there.


The packaging that the single piercing heads came in --- had this on the back of the package. I peeled away at the cardboard(s) until I just had the top image(s). Cut them to size and ATG'd them to a piece of cardboard. Now, I have an "easy to see, at one glance" other ideas for the piercing heads.


I just love it when a plan comes together.


Friday, June 3, 2011

Crafting area

Creations with Christina wants you to show your desk in its natural state right now --- no cleaning up. Well, it just so happens that one of my desks still looks like this:-But. . . . shhhhhh! Don't tell her! ---- The rest of my craft area isn't so clean. Neither are my other 2 desks. (tee-hee).


Here's a li'l "chuckle" for you. . . .

I got the biggest kick out of this. Hope you like it, too!!! :-)

Before you click on it, be sure to turn off my I-Pod. (located almost at the bottom of this column) :-)


FeedJit Live Traffic Feed

Thank you for visiting ladybug

Thank you for visiting ladybug

Birdie thank you

Birdie thank you