owl

Background Image - Ladybug

Follow Me Frame

Follow Me Frame

More to see

More to see

Translation Button

Welcome ladybug

Welcome ladybug

Thanks for stopping by

Thanks for stopping by. Hope you enjoy your stay!

I've noticed that I have visitors from all over the world. To make your stay more enjoyable, I have added a "translator" for you.


Showing posts with label Halloween. Show all posts

Friday, November 8, 2013

Cricut Circle Challenge #5

1.    Make a Halloween or Autumn themed mini-book, any style, any size, and any length you like. Use Black, Orange, Grey, Purple and White colours, some sparkle, and stamping. It could be a brag book, a costume book, autumn colours book, a prank book, a recipe book, anything you like within the theme.

I used each and every colour mentioned: black, grey, purple, orange, and white. Threw in some Cricut green, too. This is a brag book of my li’l Bailey in his Halloween costumes.  J

I mainly used the Horizontal Mini Album on p. 14 but added other pages from other carts.


Wednesday, October 31, 2012

Happy Birthday Halloween card


I created this card for my Mother-in-Law, whose birthday is on Halloween.

Inside:- 


Tools/Items:-
Cricut Imagine
Cricut Cartridge – A Frightful Affair
Cardstock -- white (for the Imagine & card base); orange (card layer)
Glue – ATG; Zig Two-Way
Martha Stewart Punch Around the Page -- Spider Web
Martha Stewart Deep Edge Punch -- Pumpkins
Stickles -- Holly
Glitter Tape
Pop Dots


Card base is 5” x 7”.

Cut and print, w/ the Cricut Imagine, using “A Frightful Affair” cartridge:-

p. 38 of the handbook
-- for the skin tone, I used RGB code:- 255-220-177
Layer – used black

Cut the witch at 4”, and the layers accordingly.  Adhered together.

Using orange cardstock, used the Martha Stewart “cobweb” Punch Around the Page

Adhered a background paper and added some Glitter Tape on the sides.

Attached the witch, using popdots.  Glittered the hat brim, the li’l rat, tops of shoes, and top of cauldron.

Computer-generated “Stirring up some. . .” using “Halloween Spider” font.

Inside of the card:

Using the Martha Stewart Pumpkin Deep Edge Border punch, created a border of 5 pumpkins.

Computer-generated the word clouds, as well as the “WISHES” sentiment.  Punched the edges with the cobweb corner punch.


Sunday, October 9, 2011

Halloween Birthday Card


Made this gate-fold card for my Mother-in-Law who has a birthday on Halloween.  Gave it to her early, as we saw her for Thanksgiving, and I didn’t want to put it in the mail, because of the bulkiness (from dimensions) of it.

 when opened:-
 back:-


Was made completely using the Happy Hauntings cartridge.  I used, however, the Imagine More cartridge for the floodfilling of the patterns on the pumpkins and the “B” in BOO.

Tools/Items:-
Cricut Imagine
Cricut Imagine Cartridge – Imagine More
Cricut Cartridge – Happy Hauntings
Glue – regular; ATG; Zig Two Way
Cardstock – double-sided for the card base; white (for the Imagine)
Patterned Paper
Ribbon – Halloween “Celebrate It”
Die Cuts – from K & Company – bats, eyes, ghost
Stickles – purple (??) and orange (Distressed Spiced Marmalade)
Seed beads – cat’s eyes
Pop dots
Sentiment -- used the following font:-  “Lunacy More”

While using my Stickles, I discovered a couple of things:-

(1)     The purple one has an “unknown identity”.  The poor li’l thing wasn’t named.  So, he’s just going to be known as “Purrrrty Purple”.  J  I have a few other ones that are nameless.  L
I wonder why these larger ones weren’t named??
(2)     The orange one is a “Distressed” one.  Noooo, he’s not suffering from distress, that’s just what Tim Holtz named him.  Having said all of that, I discovered that he has a much larger nozzle, which made his outpourings a lot thicker than the usual thin line of the regular Stickles.

I wasn’t too sure whether I liked the Distressed Stickles, or not, because of this feature.  But, I read on the Net that one can use a heat tool on these ones --- making them shimmer, which cannot be done with the regular Stickles.  I’m going to have to test these out to see the difference. J

Back to my card.  I wound a piece of ribbon around the whole gate-fold card and then glued a backing piece of cardstock to the back of the card, allowing for the ribbon to be hidden.  See pic.

Well, that ends my spiel on this card.  J


Saturday, October 16, 2010

Halloween centerpiece

Hiya! Hope you're all having a nice week-end. :-)

Made the following centerpiece for the hubster's office:-


Because I haven't received my "Happy Hauntings" cart yet, I used $ store bought items. However, hubby was ecstactic (his words, not mine!) and that's the main thing but. . . . . . . . if I could've used my cart. images, look at what I could've cut out:-


To make the centerpiece, I bought a pail (already in black! yeah!) and covered it w/ a black Halloween garland w/ shiny purple bats, using my ATG down the sides of the pail. Put a styroform block inside the pail and covered it w/ a "cobweb". Looks like a bubbly cauldron. :-)

Used wooden skewers and covered them w/ black electrical tape. There were doubles of the li'l cutouts and, because they were double-sided, I placed a skewer between the two of them and glued them together. Inserted them into the pail and "Bob's your Uncle"!!! :-)

The sign was another $ store bought thingie. Computer-generated the sentiment.

Would love to see your centerpieces! :-)

Wednesday, October 13, 2010

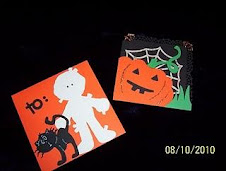
MIL Halloween Birthday Card

Made the following card for my Mother-in-Law (MIL), whose birthday is on Halloween.


Inside:-


Because the Wild Card cart, whilst utilizing the envelope, would cut out the card base at 3 ¾” x 3 ¾”, I decided to cut the card base out separately, at 5” x 10”; hence, making my own envelope using the MS envelope maker. Once I figured out the mathematical challenge, it worked like a charm. (see instructions below)

Also, because this card is for my MIL, I put a “mummy” on the front of the envelope. I think she’ll get a kick out of it!! Get it?? To: Mummy!! LOL

Mainly used the Wild Card cart for the card base, w/ the exception of adding the MS spider web punch around the sides. Wasn’t too keen on the spider that was on this cart, so used the cute li’l spider from the Paper Doll cart. The mummy needed a friend, so added the li’l cat from the Paper Doll cart. You could use a “to:” from a lot of different carts, but I chose the one from the Christmas Cheer cart.

Added Copper Stickles to the pumpkin to give it some definition. Added a pop dot to the spider on the web to give it dimension. Added Copper Stickles to the spider web to jazz it up a bit.

Computer-generated the sentiment and inserted it into a tag frame, using the Tag Maker.

The envelope was a li’l bit tricky, as I had to figure out the dimensions for cutting and scoring on the MS Score Board, using the envelope maker. I wanted an envelope to fit my 5” card, so had to create one that was 5 ½”.

Here are the dimensions/instructions I came up with:-

* Cut your cardstock to 9" x 9"
* Using the MS Score envelope template, score ALL sides at 3 5/8”
* Fold all the sides, then snip the li’l triangles
* Glue sides together, flipping up bottom and glue to sides, leaving top open

I then added a li’l liner.

RECIPE:-

Tools/Items:-
Cricut Expression
Cricut Design Studio
Cricut Cartridges (see below)
Martha Stewart Round the Page punch – Spider Web
Martha Stewart Score Board Envelope Maker
Glue (regular, Glue Glider Pro & Zig Two-Way for small items)
TagMaker and tag
Cardstock
Stickles – Copper
Popdots
Sentiment – computer-generated

Cricut Cartridges used:-
Wild Card – card base; pumpkin and stem; web; bat & spider (opt.)
Paper Doll Dress Up – cat & mummy (for envelope); spider
Pooh & Friends (opt.) – moon
Christmas Cheer – to:

Had a lot of fun making this card. Hope I gave you some inspiration to make your own. I’d love to see it, if you do.

I’ve included the cut file, for those who would like it.

http://www.mediafire.com/?5qccnz3xclu5j0j

FeedJit Live Traffic Feed

Thank you for visiting ladybug

Thank you for visiting ladybug

Birdie thank you

Birdie thank you