owl

Background Image - Ladybug

Follow Me Frame

Follow Me Frame

More to see

More to see

Translation Button

Welcome ladybug

Welcome ladybug

Thanks for stopping by

Thanks for stopping by. Hope you enjoy your stay!

I've noticed that I have visitors from all over the world. To make your stay more enjoyable, I have added a "translator" for you.


Showing posts with label MS - Ladybug. Show all posts

Friday, November 8, 2013

Cricut Circle Challenge #6

1.      Use any image from your NEWEST or any UNUSED Cricut purchase to create a new card, layout or 3D project of your choice.

I had just found out that a friend had Breast Cancer, so I made her this card. I had an Imagine cartridge that I didn't think I'd need for a while because of the designs on it (kinda babyish and I don't have any DGC yet), so it just sat there, unopened --- until now! I found the cutest ladybug on it. 

I used Hey Diddle Diddle for the ladybug and Autumn Celebrations for the Cancer ribbon. Her hat is from the Kate's ABC's cart. 
 

Also used the MS ladybug Punch Around the Page. 


Saturday, October 30, 2010

Cards for Monique and Brenda

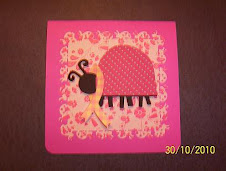
I made two of these cards for two special ladies, who are going thru a really rough time right now w/ breast cancer. They’re both having double mastectomies this week. Please keep them in your thoughts and prayers.

For Monique and Brenda. . . . . . .

Inside:-


If you would like to send them a card, I know they would absolutely love it. You can find their addresses on the Pink Stamper’s website.


RECIPE:-

Tools/Items:-
Cricut Expression
Cricut Design Studio
Cricut Cartridges (see below)
Martha Stewart Punch Round the Page – Ladybug
Glue - ATG
Cardstock
Patterned Paper
Popdots
Corner rounder
Sentiment – computer-generated


Cricut Cartridges used:-
Walk in my Garden – Ladybug, and layer
Pink Journey – ribbon

Using the Cricut Design Studio, I placed two ladybugs from the Walk in my Garden cart. on the mat. Both are 2.75”. Placed the body layer on the mat, also at 2.75”. using the “hide contour” feature for the dots. I wanted their bodies to be whole, instead of showing the black round dots.

Placed the Breast Cancer ribbon from the Pink Journey cart. on the mat at 2.75”.

I’ve included the cut file, for those who would like it. You can also find it, along w/ some others, in my “Free Files” section, located on my side-bar, at the very bottom.

Card base is 6” x 12”, folded. The top layer is cut at 5” x 5”, using the MS Ladybug Punch around the Page punch set. Cut the li’l ribbon open and placed over the ladybug’s head. Popdotted the ladybug onto the card.

The sentiment inside was computer generated, on a 2.75” x 3.25” piece of paper, that was corner punched, using the Ladybug corner punch.

Corner-rounded the corners.

Hope these cards put a li’l “smile” on their faces. They need all the smiles they can get right now.

DS cut file:-
http://www.mediafire.com/?682i3k0999m2dyv

Saturday, October 23, 2010

All Occasion Card

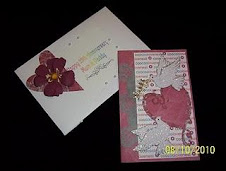
Here’s another card, using the circle “thingie”. (Don’t know what else to call it!) :0)
But I added some li'l corner cuts. (instructions below)

Here are 3 different size circles, cut w/ the Martha Stewart Circle Cutter:- 2", 3" and 4", using the corner punch around the perimeter. I chose the 4" for this card, but just wanted to show the variety of sizes.

RECIPE:-
Martha Stewart Punch Around the Page:- Swirling Lace Martha Stewart Ladybug punch - ladybug
Martha Stewart Circle Cutter - circles
Cardstock
Glue- ATG and Zig Two-Way (for smaller items)
Stickles – Magenta
Ribbon


The card base is 5.25” x 10.5”, folded. The layer is cut at 5”, using the corner and border punches.

This time the circle was cut, using the MS Circle Cutter, at 4”, cutting around the circumference using the corner punch. Then I cut, separately, 4 corners to attach underneath the circle, just to jazz it up a li’l. Here’s how I did that:-


Then, inserted them on the 4" circle.....

Cut another circle 2 ¼”, adhering to the first one. The patterned paper has a flower on it. Now, what should go on top of the flower?? Well, that’s a “no-brainer” for me ---- a li’l ladybug, of course. :-) Soooo, used the Martha Stewart Ladybug punch and pop-dotted it on. Added a bit of Stickles.

If you click on the picture, it will enlarge and you’ll be able to see the card in more detail. Can you see the li’l ribbon I wove thru the lace? It’s a “sparkly” ribbon w/ both of the colours of the layers.

There are just sooooooo many things you can do with the MS Punch Around the Page punch sets. Hope I’ve given you lots of ideas.

I’d love to see your creations. Just leave me a comment on my blog and I’ll make a point to visit yours! :-)

Thursday, September 16, 2010

Anniversary Card

It’s our 32nd anniversary today. It's been 32 lonnnnnnng years. Just kiddin'. :-) My sweet hubby (next to my daughter) is the best thing/person that has ever come into my life. This is what my Sweetheart gave me:-


Can you spot the two li'l ladybugs on the flowerpot? Cute, eh? :-)

Here’s the card I made for him:-


You can click on the pix to see larger images. :-)


RECIPE:-

Tools/Items:-
Cricut Expression
Cricut Design Studio
Cricut
Cartridges (see below)
Martha Stewart punch – Quilted border; Ladybug
Glue (regular, Glue Glider Pro & Zig Two-Way for small items)
Corner Rounder
Patterned Paper
Cardstock
Stickles – Candy Cane, Gold
Popdots
Googly eyes
Seed beads

Cricut Cartridges used:-
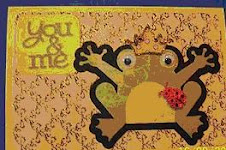
Paisley – frog prince; shadow; eyes; belly; crown
Sweethearts – Happy Anniversary; Sweetheart; You & Me; xoxo’s

Because my hubby is my “Prince”, it only seemed natural to choose the “Frog Prince” from the "Paisley" cartridge, for his card. Because I’m his “Ladybug”, I’m sitting on top of him. Hence, “You & Me”. :-) I stickled both the crown and myself (Ladybug). :-)

Used the MS “Quilted” border punch for the inside of the card. The card base is 6” x 9”. I’ve included a cut file, for anyone who is interested.

http://www.mediafire.com/?l20smoqnz8h3zol

Sunday, March 14, 2010

Tip for MS Ladybug Punch around the Page

Hiya! Hope everyone is enjoying their week-end. I went to a sewing/craft show yesterday and had an absolute ball. I've been to the sewing one a couple of times but, this year, they incorporated a craft showing. Vendors from all over Canada came to it. It was awesome.

I ended up w/ some goodies:- a GlueGlider Pro (which I've always wanted); some Core'dinations Paper (yahoo!); a Yo-Yo maker (yes, you heard right, LOL), and an owl Cuddlebug embossing folder. I was very pleased. :-)

So, I set off making my "Signature" Ladybug cards, using my GlueGlider Pro. I absolutely LOVE it. I do have an ATG but I think I like the GlueGlider better. I'm sure I'll prefer the ATG for other larger projects, tho.

Anyway, I was utilizing my MS Ladybug Punch around the Page punch and, instead of placing that on black paper, I just wanted to have black showing thru the ladybug dots so I came up w/ the idea of punching out some small black hearts and gluing them to the backside. Worked like a charm!! :-) Here's what I used and a pic of same:-


  • MS punch set

  • heart punch - 5/8" (came from a set but I'm sure they can be purchased separately)

  • Zig two-way glue

  • small scissors (to trim away the tips of the hearts)


Sorry, but I can't show you the finished card(s) cuz they're going out to some blogger friends! ;-)

FeedJit Live Traffic Feed

Thank you for visiting ladybug

Thank you for visiting ladybug

Birdie thank you

Birdie thank you