owl

Background Image - Ladybug

Follow Me Frame

Follow Me Frame

More to see

More to see

Translation Button

Welcome ladybug

Welcome ladybug

Thanks for stopping by

Thanks for stopping by. Hope you enjoy your stay!

I've noticed that I have visitors from all over the world. To make your stay more enjoyable, I have added a "translator" for you.


Thursday, April 29, 2010

Bailey visiting w/ friends....

Please join Bailey on one of his li'l jaunts........

Momma, that li'l kitty won't chase me, will he??

I love the stories she reads to me......

Never could figure out what he keeps looking for/at, Momma.

Any doggie lover is a friend of mine, Momma........

Momma, I guess someone forgot to bring him flowers today. He's always holding flowers.

Monday, April 26, 2010

Birthday Card update

Well, my girlfriend "loved" the butterfly card I made her. She was really stumped how I did the multi-colored butterfly on both the envelope and the card. I told her: "my secret". Naaaaah, I shared w/ her how I did it. lol Neat how us "crafters" can have "tricks up our sleeve", eh? :-)

Then........I got the following blog tag from Audrey & Team Fairies at Cute & Some, for my card:-

Piercing Template

Some of you may already have, or seen, the various piercing templates that are available. If you want to be frugal, you can use this instead:-

Recognize it? :-) It's none other than a snippet of plastic canvas --- the one w/ the real teeny weeny holes, that a piercing tool fits into real easy-peasy.

You can also use this for marking areas on your project, where you want to place your eyelets. You'll never have crooked-placed eyelets, ever again. :-)

Saturday, April 24, 2010

Made my own background paper!

I saw the awesome JillyBean Soup paper that has every image imaginable on it and was especially taken w/ the lemon background paper.

Even tho I have Photoshop Elements, I find it very intimidating and haven't even ventured to test it out.

I said to myself:- "Myself -- surely you can make this via other means." And, by George, I did. :-) Sooooooo, if you're like me and would like to make your own paper and you don't have any PhotoEditing software, here's how you can do it:-
  1. Find the clipart you would like.
  2. Copy/paste into Word document.
  3. Copy/paste a kazillion times. (I did it for 9 images) :-)
  4. Draw a border around all of your images.
  5. Copy/paste into "Paint" program (the freebie on your system).
  6. Using the "Fill with Color" feature, choose your background color and fill the background.
  7. Voila --- your very own created background paper.

This would work great w/ the Cricut "Just Because Cards" cartridge, using the Lemonade Glass found on p. 69. This cart also has the cute saying: "When life gives you lemons...make lemonade."

Can't wait to make this card. :-) And.....my mind is racing w/ all of the other possibilities of background paper. ;-)

Let me know what kinds/sorts of background paper you make! :-)

Friday, April 23, 2010

Another Thrift Store find.....


If you can believe this, I hummed/hawwed about getting this item. It's actually a photo box and it was the grand total of $3.00!! That wasn't the issue but......what am I going to use this for?? So, after staring at it for quite sometime and Bailey, who was in my arms, saying:- "Momma, just GET IT!!!!" -- I did! :-)
Soooo, now what to do w/ it! :-) I thought maybe:-
  • "card idea" pix (I already have some in an accordion folder unit.)
  • Cricut cutouts
  • Studio "G" stamps (they might be toooo thick, tho)

What would you use it for?? Any and all ideas are greatly welcomed!

I do plan to cover the top/sides w/ some funky paper or vinyl. :-)

Cute & Some's blog

It was suggested that I enter my card into Audrey's "Cute & Some's" contributors showcase, so I did. :-)

You have GOT to check out her blog:- Cute & Some . There are some awesome entries. :-)

Also, stay awhile on Audrey's blog and you will discover a gal w/ some great creativity, herself. You won't be disappointed. She isn't just into "paper" projects, she is multi-talented w/ her creations. Click on Miscellaneous Crafts/Gifts, under her "Labels", and you will find projects like her cute li'l chenille bunnies and money tree, just to mention a couple.

Saturday, April 17, 2010

Birthday Card using Sentimentals

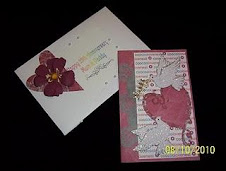
Hiya. Thought I would make my friend a Birthday card w/ the cart I won --- Sentimentals!
Thanks, again, Michele!! :-)

Both pix can be enlarged by clicking on them! :-)


Betcha thought the blue was showing thru the butterfly, eh? Nope! But I did use double-sided cardstock. Only I flipped the butterfly on both the card and envelope, to show the opposite side colour.
:-) You can see it better in this pic:-

Here's the recipe:-

Cricut Sentimentals cartridge

Envelope:-
p. 46 {buttrfly}[envelope]

Card:-
p. 46 {buttrfly}[card]

Butterfly:-
p. 46 {buttrfly}- main part
p. 46 {btrfly-s}- wings

Sentiment:-
Thinking of You
p. 48 {owl}Phrase

I used gluestick, attaching the wings to the butterfly; hence, glue was sticking thru the filigree. I then sprinkled Martha Stewart glitter on top, allowing the glitter to adhere to the areas inside the butterfly. I thought it was a nice touch. Then I added some rhinestones to the body of the butterfly. Pop-dotted the butterfly inside the card. Added seed beads to the antennae. The butterfly on the front of the card was "stickled".

Hopefully, my friend will like it.

Note:- you'll notice on the envelope --- 4 slits on the sides.
Tip:- when scoring (I used my new Martha Stewart scoreboard!), try not to score on the slits. I didn't realize that it was an actual slit, and not just an embossed score area. :-

Decided to change it up a bit:- added a computer-generated sentiment......

FeedJit Live Traffic Feed

Thank you for visiting ladybug

Thank you for visiting ladybug

Birdie thank you

Birdie thank you